I have prepared a new tutorial which is going to show you how to make an interesting bracelet with little of beads and with a little of time. This double strand bracelet instruction is super easy and if you didn’t follow my previous tutorials, you will still understand how to follow this one. First, you need to cut bracelet wire which will be about 50 cm long. Then, you need to feed it through the eye of the locker, bend wire half way and pull on a metal bead through both ends, and press it with the players to secure the wire in place. Then select your favorite color and size of pearl beads. Start with one seed bead at the beginning with both wire and then split them and count about 8 seed beads on each (this is for a medium size of pearl bead which is about a quarter of an inch big). Then you need to “cross” wires feeding through one seed bead on each side at the same time. Now I have counted 6 seed beads on each wire and crossed them again on the next pearl bead with two seed beads, one on each side of the pearl.
 You will have to repeat the procedure several times until bracelet will reach required length. I suggest you put one pearl less than needed because all of those curved wires with seed beads will get flatten a bit and bracelet will automatically get a bit longer.
 To finish bracelet you will have to end it with 8 seed beads again, then, feed both wires through the single bead.
 Now you add a metal seed and the other part of your locker. You need to be careful and not let wire to get loose and move segments of the bracelet. Then you pull both wires back through the metal bead and make it tight.
 Press the metal bead with pliers and try to feed ends of wires through few of small glass seeds to hide it before the final cut.
 What do you think about it? It was not difficult at all and the result is very unique. This double strand pearl bracelet can be made with any size of pearl beads and I think it looks really bold when pearls are bigger and small glass seed is in direct contrast to the pearl.
 I love how it presents on my hand and believe me it works with any type of outfit.
Category Archives: Beaded Jewellery
Double Strand Crossing Bracelet
As I have promised I have prepared another tutorial on a double wire beaded bracelet which I have named Double Strand Crossing Bracelet to highlight the difference between those two tutorials.
You will need about half a meter long wire, locker, pearl beads and glass seed beads. You will have to prepare the wire exactly the same like we did it for the previous bracelet by securing the wire on one side of the locker with stainless steel seed which has to be squeezed with players to keep it in place.
Then we need to add 9 seed glass beads on each string and cross the wire on the pearl bead. Then you need to add another 9 seed beads on each string again and cross them on the single seed bead.
 After that you will add another 9 seed beads and add another pearl bead and cross the wire through it.
 You will go on with same pattern until bracelet has desired length. My pearl was about 1 cm big and it took 6 of them to complete the full size of the bracelet.
 Then I have added second part of the locker and secured the wire with steel bead.
 It is not to bad but I was not happy with those wires coming out from the pearls. There was no simple way to cover it up. I have tried to feed wires though singe seed which should cover top and bottom of pearls but then wire got dis-formatted and it didn’t float nicely between the pearls anymore.
 Then I thought we can spice it up a bit and make same patter but in fancy setting. I have used glass beads and charm beads.
First change to the earlier pattern is that instead of single seed bead to cross wires I have used two of them, one on each side of crystal bead. Another difference is that I have managed to hide the wire which is crossing the charm beads. I have added 5 beads which are going through the bead opening and both wires crossing each other at the same time while crossing inside of the charm bead.
 You may have to use 5 or 6 additional seed beads inside of big bead. All dependence on the thickness of the seed beads as they are not even with each other.
 This picture shows clearly how I have crossed the wires.
 Then you go on and on until bracelet is finished.
  It got a bit longer than the first one due to the additional crystal beads in between those big once but it was maybe 1 cm longer which doesn’t compromise functionality.
 It looks better than the first one with white pearls and the pattern is so similar.
 It is my new favorite one! Which double strand crossing bracelet would you prefer?
Double wire beaded bracelet is so much more fun than single wire. It opens so many new possibilities and gives much more interesting results. I got in love in it so you should expect more tutorials coming up soon.
Double Wire Beaded Bracelet
I was searching for some super nice Mother’s Day Gift Idea and I came across this beautiful design of a bracelet. I know my Mom would love it in the colour red so I have decided to make it right away and to share it with you. Double Wire Beaded Bracelet is not so difficult like one could think. There is so many ways of twisting those two wires to make stunning designs. I will share few of them during upcoming weeks and I hope you will find some of them or maybe all of them, interesting and add them to your personal collection. We need to start with fixing wire on the end of the locker. I have used about half a meter long wire and band it in half which has created two even ends. I have added a metal seed size 2 and I have squeezed it with pliers which will stop the wire from moving and make nice a clear connection with the locker. I have used the smallest pearl beads which is about 2 mm diameter and a medium bead which is about 5 mm but if you use bigger (7 mm) pattern will look even better but then you will have to add another small bead on the top wire.
 Can you see how the top wire is cuddling bigger pearl? Now you need to add a second section which will repeat of this what you did before but now the big pearl will go on the top wire and smaller will go on the bottom. Then you have to do it repeat and switch sides again. Remember to cross wire in the fifth bead.
 You have to go on until the bracelet will have the desired length about 18-20 cm and it took me 13 sections to get it right. It all depends on the size of the beads you will use. Some of them maybe a bit smaller or bigger, so you will have to work out the adjustments.
 Now you will have to add second part of the locker. I have added a metal seed bead again to have wire locked and stop from moving. Make sure both wires will go through it.
 Now once you have locked it with pliers you will have to push each of them through couple of beads and then cut it off as close as possible. It will create neat look and professional finish.
 The finished product is just adorable. Then you can make more with different types of beads and create different colours on different occasions. I love the purple one where I have combined glass medium size seed beads with medium pearls. This Double Wire Beaded Bracelet turned up super nice and you probably know best which colour would make your Mom’s eyes to sparkle. There is so many Mother’s Day Gift Ideas out there but nothing says how much we love them like hand-made gift which they can treasure for long years.
Pearls Bracelet
 I love to mix and match so we will make a little break from sewing and we will check on this super cute design of a pearl bracelet which is easy to make and it matches so many different outfits.
The first and the most important is to pick your favourite colours and sizes. I have picked mine but now when I have second look at it I regret I didn’t add few bigger pearls here and there. As you can see we need pearl beads some eye pins, chain with defined size of eyes and the locker.
 I hope you have noticed this special type of the locker? This one is usually used to lock necklines with a ribbon but I thought it will be great for multi layers bracelet. I love those small eyes on the end of each part. I will add 5 individual bracelets to it.
I used eye pins to make lots of pearl beads which are ready for connection with jump rings and pieces of chain. To make it interesting I thought of connecting them with different length of chains which will make the impression of bulkiness. Pearls will overlap each other and if you would go for several sheds of same colour it would look absolutely beautiful as well.
 Once you have all 5 chains you are ready to add it in to the locker. You have to make sure that chains are equal length or gently decreasing length if you want it to keep layers of colour not mixing up while you are wearing this jewellery. Bracelets usually rest slightly below the wrist which has irregular shape. You can try to manipulate length of individual chains to make them fit perfectly. I did it with this one and effect was really good, each chain kept its position.
 You may have to add all chains to the locker and test it first before finding right length of an individual chain. Another important thing is to have all rings and eyes locked fully. You can see on below picture example of few gaps which can cos issues and disconnection. We want to avoid it at all cost so please double check each loop before wearing your pearls bracelet, this will save you some time fixing it later on.
 This is final effect. Looks really good. Between any other pearl jewellery making ideas I found this one medium easy and you need to invest some time to incorporate pieces of chain between pearl beads but it is worth it. I didn’t see similar bracelet anywhere in town!
 Since I like it so much I will make further tutorial on this how to make pearl bracelet designs and I will share it with you. This is all about imagination and an ambition. If something looks a bit difficult to you it doesn’t meant you can’t do it. You just need to try, and then try again until you make it 🙂 Good luck with your imagination and awesome designs of your own.
French Hook Earrings
One of the most popular earrings on the market are French Hook Earrings. I love how simple they are and how feminine. This is why I have selected this type of earrings for my bracelet + earrings project. This is second part of tutorial on this how to make your own beaded jewellery and this time we will make second part of our set: earrings.
Wouldn’t you wear it? I know it is a bit longer than your usual earrings but trust me it will not catch fabric of clothes on your shoulders or tangle in to your hair. It looks gorgeous, makes your neck looks longer and sparkle is truly hypnotizing.
We need to start with our item list. I tried to take best picture possible to show you what I used to make red earrings just this time I’m using black beads to match the bracelet which I made before. First I have made middle part of earrings.
 Two crystals on one eye-pin. You have to make sure crystals are small enough to fit on the pin and there is still some space left for second eye on the other end.
 We obviously need two of them. Don’t get frustrated if you can’t make nicely shaped loop first time, it took me a while before I have managed to twist mine the way I liked it.
 Now we need to create lower bead with its decoration. You can add single silver “cup” over it or make it with two like I did but some people may feel this is too much…, it is up to you really… If you noticed there is a small silver bead on the bottom of the pin. I had to add it to keep black bead in place as pin’s head wasn’t wide enough and it was passing throughout the bead. Make a pretty loop on the end again and now we just need to connect each element.
 I have used 4 mm diameter jump rings in between.
 It made two fantastic earrings. Now I have 3 sets ready and believe me or not but it takes about 10-15 minutes to make one. I had to spend more time on the pictures as photographing small shiny elements is very difficult.

 Which one is your favourite? Black and red are already sold. I think it proves how good idea and hot commodity it is… if you like I can make any colour specially for you or your loved one. I’m sure you agree French Hook Earrings are fashionable and elegant.
Beaded Bracelets Designs
 We are always in the search for a good gifts ideas. When I think about what to buy for my mother or cousin I always think what I would like to get myself. These days I’m more and more involved in jewellery making and looking for inspiration here and there. I have notice how complicated it can get and if you are just a beginner in beaded jewellery you may feel intimidated and don’t even try to create something by yourself. You shouldn’t bee as even most simple project may turn in to a stunning set which your family will love to wear. You have to remember that anything hand made is in price right now. I have two part tutorial on simple wire bracelet and matching earrings for you.
I looked at many bracelets at stores and on line. They are basically a pattern of selected beads. Our preferences as a buyers are endless so do types of combinations for beaded jewellery. My beaded bracelet designs brakes one of the rules. There is no straight pattern. I have selected my favourite beads and wired them in a random order. Just because colour is same or similar it makes it to look attractive and most important is sparkle which will bring anybody’s attention.
I made a crystal white and crystal red with white before and now I will show you crystal black with touch of white step by step procedure for quick and elegant bracelet.
 First we need to start with connection of wire and locker. There are few types of wires and I was going to study about it before selecting one but finally I have realised that it doesn’t really matter. Until wire is from stainless steel or silver it will do the job for light type of bracelets like mine.
I have cut piece of wire about 7 cm longer than desired length of bracelet. You can take a measurement form your other bracelet which you have or simply wrap wire around your hand making sure it is loose enough to accommodate beads, wrist and allow you to lock it with other hand quite easily. My bracelets are 20 cm long so I had to cut about 27 cm long wire. When you start putting on beads they should easily go over double wire as shown above.
 After few beads spare wire will disappear under it. As you can see little loop over the locker ring is nit and in my opinion looks really good.
I have picture of shop bracelet just to show you how it should be secured in professional way. You can see it in the circle. Wire is white and there is a little piece of metal locked on it to prevent from moving or slipping out from the beads string. It is probably a good idea but I did make few bracelets without it and wear them for a while and didn’t have any single problem with wire going loose.
 When you pulled all beads on and you are happy with their position and overall look of bracelet you need to close it on the other end.
 Simply feed wire through the ring and then twist it around itself just below the ring.
 Extra wire should be pushed back in to the beads. It is a bit of workout especially when you like to push through as many beads as possible but about 3 or 4 shouldn’t be a problem for anybody.
 As you can see end of it can be pulled out in between the beads and the cut off carefully and hidden underneath.
 Can you see it? In my opinion it looks even better than a professional bracelet example.
 It was very easy and very quick, now I can make as many bracelets as I want and I’m sure there will be still some left for sale. I really love working with beads. It gave’s so many possibilities, each item can be unique and specially designed for an occasion or your outfit. If you were thinking to try beaded jewellery making for some time I hope this post is going to encourage you to go ahead and start your own beaded jewellery collection or simply use it for your gifts ideas, I’m sure your family and friends will appreciate it.
Jewellery Organizer
 I was planning to make my jewellery organizer since I have started doing beading jewellery. I knew that my collection will grow rapidly and there is no way I will manage to fit it all in to my old jewellery box.
As you have probably notice by now I prefer to have hand-made items than those from the store. It adds unique look to my house and to myself. This project is like many of my other projects and I simply love to share it with you. You can add your own special decoration or construct it in the different type of shapes.
Lets start from list of supplies you need to complete this project. I have used medium and large pieces of wood, well these are actually sticks for steering of wall paint which my local hardware store is handing out for free. How lucky! It is light weight material and has perfect size for my needs. I don’t have to do any dusty cutting or even pay for material! We also need strip of fabric (I have used canvas), hangers, glue, nails, hammer, wood staple and set of narrow hinges.  First I have painted my wood in white. I have used my acrylic paint and big brush.
 Then I have set it in the way I imagined. I have 4 horizontal and 4 vertical layers. I have pin them all with the nail. Unfortunately I had them to long so I had to bend them on the back and flat.

As you can see I have skipped one row which I have plan for an earrings. Very top if for rings, then bracelets, third for earrings and last row is for necklaces. I have also different distance between them to use space as per need. For this row I have decided to wrap wood with canvas fabric and leave little pocket on the front so I can use it for hanging my earrings. I have used Mod glue which is perfect for fabric and wood combination.


 Make sure to use glue generously especially at the left and right end to prevent fabric from hemming.
 Then I nailed it in the right place, and also stapled fabric on the vertical posts for better grip, so weight of jewellery will not pull it down to much.

 Now tricky part. We need to add hinges on the top of each post and add a leg. Well you don’t have to add leg if your organizer will hang on the wall only. I’m planning to use mine on the art fairs to display jewellery I made. I will be able to stand my jewellery organizer and hang it too.
 First I have screw them on the main part of organizer. As you can see there are minuses of materials which you can get them for free. Wood is splitting a bit as it is worst quality and very thin. It is not a big issue and construction wont fall apart but if you pay attention to details I thought it is worth mentioning. Now I have constructed my leg and attached to the front of the organizer.
 This was really difficult as leg has less layers of wood and there was not much material to get screed on but I have managed 🙂
 I have to correct painting here and there as it got scratched in few places from the hammer. Then I could work on those hangers. So easy to put it on with two-sided tape but there was so many of them and had to make them straight in the rows and columns.
 Now I just need to organize my jewellery. It is important to separate gold with silver and metal as those materials affect each other and small elements will transfer between them affecting quality.

 Oh yes, I had to add small bows on left and right to keep the leg flat. It will probably settle after a while but for now I need something to keep it closed.
 This is how it looks standing. Exactly how I planned it.
 How neat is that? Now I can go back to jewellery making and add more items on this awesome jewellery organizer. I just hope I will not have to make another one soon 🙂 It wasn’t so difficult! Now you know how to organize jewellery with little money and little efforts.
Busy with Beading

I didn’t expect how much I will get in to this beading idea. I started shopping for different designs of beads and connections so I was buried in jump rings and pins for last couple of weeks. Internet is full of instructions and projects from small to big pieces of jewelry. Most important is not to get lost and stay truth to your own idea and vision.
My first idea was to make a nice collection of items which are going to match so I can wear them together with original silver or golden pieces which I already have. Firstly I wanted to make a bracelet which is going to match this gorgeous ring which is made of black silver and has meddle eastern design which makes it to look like an antique. It is not easy to find similar beads to make sense out of it.
 This is the ring and I wonder if it makes same impression on you like it does on me? I do think it is quite beautiful.
Since I couldn’t find any beads in similar drop of the water shape I had to concentrate on the colors similarity.
I have selected some crystal beads and dark silver colored metal beads.

Believe me or not but I took at least an hour in the store selecting right type of beads and matching them with the ring.
When planning the design you need to take under consideration length of the bracelet so it will not end up to short or to long, so first I have organized beads in different patterns and spaced them out to find my favourite combination with right length and width as I did want this bracelet to be visible on my hand against the ring.
I have started with putting on eye ended pins and closing eyes on the other end. Then I have added jump rings to connect them in between.
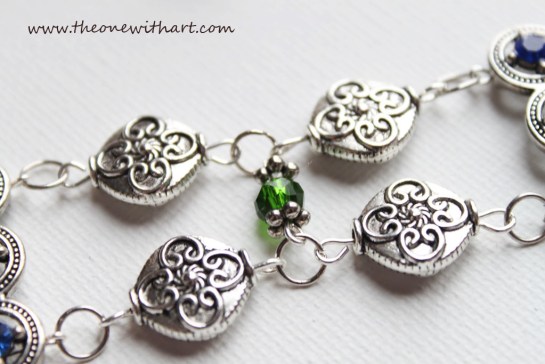 After that I have added dark green beads in between to add this green centre like in the ring.
 Then I have started adding some white beads to put more blink in to the bracelet and connect with white crystals in the ring.
 Those small beads were so difficult to make I had to be very careful to not damage them.
I fitted them in between to feel up the gaps. This gives even richer look.

 How do you like it? Does it look anything like the ring? I do think it matches. Love it, love it a lot!


It was quote a challenge to narrow from 3 beads width to one in order to put the lock at the end, but I think this has turned up quite well too.
Busy beading weeks are still to come. I have got hang on the tools and connections and twisting those small eye shapes on the end of pins now I can work with my imagination and show you as many of interesting designs as possible. I hope you will like them and I promise to be creative and show something different from what you can find all over the internet.
Beaded Jewellery – Silver and Purple Bracelet
 I got my tool kit box such a long time ago! Sometimes I was even wondering if I should have invested in it at all. It was getting dusty in the storage room, but since we got back from Kurdistan I didn’t have time to work on any other more time-consuming projects, so I decided to pull out the box and see what interesting things could come out of it.
I had never done beading before but I was thinking it couldn’t be so difficult since other people are doing it as well and they are selling lovely pieces in quite successful businesses.
Well, I was wrong… beading is actually quite difficult and now I’m much more impressed with the designs and ideas which I have seen so far. Beaded Jewellery takes some time to make and first of all you need good piece imagination if you want to come up with something interesting and beat the competition.
I decided to start with something simple to get familiar with the tools and types of connections between beads.
My project was: a silver bracelet with a couple of charms (a silver frog and small silver pendant with a purple gem), a chain of purple beads and a chain of silver beads, both made of crystal.


 I selected smaller-size jump rings and short double eye-pins.
There are 3 types of tools commonly used to create beaded jewellery. They look like on the photo below: from the left crimping tool, wire cutter and round nose pliers.
 First we need to prepare the bigger size beads with double eye-pins. As you can see there is only one eye and we have to create a second one and close the loop with the tools. You need to grab one end and hold it tight and then, using the round nose pliers, grab the other end and strongly twist it around the nose. Depending on the size of your beads you may have to shorten the pin before with the wire cutter. In my situation the pin had the desired length.


 It does take some practice to twist the wire and make a good shape of loop. With first few my hands were shaking and the wire was slipping out of the tools. I think it took me at least 5 minutes to make the first one but each next one went much smoother.
Now after creating several beads with pins and eyes we need to connect them between each other using jump rings. When you are trying to open them please don’t pull the ends to the left end right as you will deform the ring. To open it you need to pull it to yourself or away from yourself with one hand only, while the other one holding the ring should stay steady.
 Now you can put two beads on it and close the ring making the same motion.
Then add another one, and another one to create a chain of the desired length.

 Now we need to work with the second chain. I used smaller size crystal balls and added little metal beads in the front and back of them. This time I decided on a different type of connection without jump rings.
 It was more difficult to work with as you had to add an eye-pin at the end of the chain before closing the previous eye-pin. There was very little room to work with and pliers were slipping from the pin but I managed and the result was as per plan.
 Now you need to add individual chains to the silver bracelet using jump rings. I used same locker which was already on the silver bracelet but you may need to add one if you are working with beads only.
Then I added my two charms and I could enjoy wearing this jewellery on the same day.
Big Mystery Box
Hi Friends!
I have something surprising to share 🙂 I have called it The Big Mystery Box.
It will be my new fresh addition to the fantastic list of interests, tutorials and projects.
We will be able to discover all of the items and learn how to use them to create fashionable style, gift items and the best part we are going to have so much fun!
Let’s open our Big Mystery Box now…
 You have probably guessed. It is a box full of beaded jewellery items. I just love it!
In this new section I’m going to introduce basics of jewellery making. Simple step by step tutorials where you will be able to discover all necessary items, tools, different types of jewellery fashion.
We are going to work on multiple projects and you will be able to find some of them in my on line shop which is going to come to life very soon.
You just can’t imagine how fantastic jewellery box we are going to create together.