Dress from Baby Onesies

VN:F [1.9.22_1171]
Rating: +4 (from 4 votes)
VN:F [1.9.22_1171]
Rating: 5.0/5 (4 votes cast)

dress from to small onesies 12I have so many things going on which I would love to share with you. Let’s start with my new fantastic sewing machine! I was waiting for it a while and I couldn’t believe I finally got it. It obviously had to be tested right away and yes it does work perfectly fine. One hour of practice at store was enough to run through all of basic options. How cool is that? I got one hour free training with purchase of my overlock machine. dress from to small onesies 14Isn’t he beautiful? Works like a dream too. I have completed a small sewing project under an hour. Dress from Baby Onesies was so quick and easy.dress from to small onesies 1I have used baby onesies which is already to small but has very good quality and I simply love this flowery embroidery on the top. I have managed to buy fabric with a matching patter.dress from to small onesies 3I have cut out the bottom of it. Then from a long strip of fabric I have added gathering to create a small skirt. Length of one part was as 3 widths of onesies.

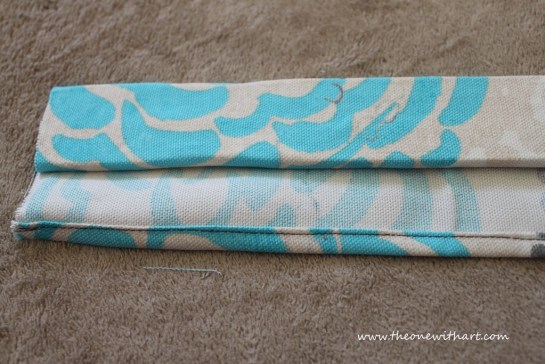
First I have connected back and front of fabric strip to create a loop.dress from to small onesies 4Please look at this stitch. It is perfectly straight and 100% professional.dress from to small onesies 6Then I added gathering all around. You have to make sure it has been spread evenly on each side and left to right. dress from to small onesies 7I really think picture tells it all 🙂 Now we need to add long sleeves. I have measured length and depth. Then I have sewn it along. dress from to small onesies 8Now tricky part. You need to add top of the sleeve on the inside of onesies on the original stitch. I have used pins to keep it in place.dress from to small onesies 9Sew around slowly and make sure to keep it straight and equally deep.

Now we can hem it all around on the bottom of the skirt and around bottom of the sleeves.

dress from to small onesies 10I sewn some clothing left with this kind of hem on the bottom but I don’t like it too much, so I have used my regular machine and straight stitch to fold it under.dress from to small onesies 11Doesn’t she look gorgeous? Dress from Baby Onesies in no time. My little girl will be best dressed baby coming spring and summer.dress from to small onesies 13My second surprise for this post is a sticker with address of my website on the back of my car.dress from to small onesies 15How do you like it? It has been already noticed and it reflex in number of visits as well. I guess it was a good idea.

Acrylic Speed Painting

VN:F [1.9.22_1171]
Rating: +8 (from 8 votes)
VN:F [1.9.22_1171]
Rating: 5.0/5 (10 votes cast)

Welcome to super speedy acrylic painting! It was always so amazing to me: speed painting tutorials! I finally have my own! This is just first one but there will be more as this looks like amazing tool to show art and engage viewers. I’m sure you will agree it is much more attractive than looking at static finished painting.

speed painting 2I have started working on Muslim Fest 2016 Art show and since I have decided to present more varieties of my art I had to start painting before end of the year so all will be ready before end of August when Muslim Fest is schedule to show

One of my ideas was to paint flowery triptych on the paper with glass over it and wooden frame. Smaller size, only 8 x 10 inches, may bring interest of many  potential customers as smaller sizes are usually cheaper than large productions.

I have broken down my tutorial to two parts and added some of my favourite music from different parts of the world. I hope you will enjoy watching it.

This is how you can squeeze 1.5 hours of work in to 10 minutes movie.

Now it is time to add a signature and my favourite stamp which tells how much I care and put all my heart in to my art.

speed painting speed painting 1Oh yes, I have mentioned that my plan was to make triptych. I have already painted 2nd part of it.

speed painting 3Third one to cone soon and I’m planning to showcase it as speed painting as well. Creating this way is so much fun not mentioning how much fun is watching it too. I hope you did feel more of connection with my work and you will come back to see it again. This is precious experience for any level of skis. It makes you feel like anybody could do it. Please don’t be shy and try! There is plenty of acrylic speed painting in the internet to choose from and there will be more on The One With Art soon..

Jewellery Organizer

VN:F [1.9.22_1171]
Rating: +5 (from 5 votes)
VN:F [1.9.22_1171]
Rating: 5.0/5 (5 votes cast)

jewelry hanger (25)I was planning to make my jewellery organizer since I have started doing beading jewellery. I knew that my collection will grow rapidly and there is no way I will manage to fit it all in to my old jewellery box.

As you have probably notice by now I prefer to have hand-made items than those from the store. It adds unique look to my house and to myself. This project is like many of my other projects and I simply love to share it with you. You can add your own special decoration or construct it in the different type of shapes.

Lets start from list of supplies you need to complete this project. I have used medium and large pieces of wood, well these are actually sticks for steering of wall paint which my local hardware store is handing out for free. How lucky! It is light weight material and has perfect size for my needs. I don’t have to do any dusty cutting or even pay for material! We also need strip of fabric (I have used canvas), hangers, glue, nails, hammer, wood staple and set of narrow hinges. jewelry hanger (1)First I have painted my wood in white. I have used my acrylic paint and big brush.jewelry hanger (2)Then I have set it in the way I imagined. I have 4 horizontal and 4 vertical layers. I have pin them all with the nail. Unfortunately I had them to long so I had to bend them on the back and flat.jewelry hanger (3) jewelry hanger (4)

As you can see I have skipped one row which I have plan for an earrings. Very top if for rings, then bracelets, third for earrings and last row is for necklaces. I have also different distance between them to use space as per need. For this row I have decided to wrap wood with canvas fabric and leave little pocket on the front so I can use it for hanging my earrings. I have used Mod glue which is perfect for fabric and wood combination.jewelry hanger (5) jewelry hanger (6) jewelry hanger (7) jewelry hanger (8)Make sure to use glue generously especially at the left and right end to prevent fabric from hemming.jewelry hanger (9) jewelry hanger (10)Then I nailed it in the right place, and also stapled fabric on the vertical posts for better grip, so weight of jewellery will not pull it down to much.jewelry hanger (11) jewelry hanger (12) jewelry hanger (13)Now tricky part. We need to add hinges on the top of each post and add a leg. Well you don’t have to add leg if your organizer will hang on the wall only. I’m planning to use mine on the art fairs to display jewellery I made. I will be able to stand my jewellery organizer and hang it too.jewelry hanger (14) jewelry hanger (15)First I have screw them on the main part of organizer. As you can see there are minuses of materials which you can get them for free. Wood is splitting a bit as it is worst quality and very thin. It is not a big issue and construction wont fall apart but if you pay attention to details I thought it is worth mentioning. Now I have constructed my leg and attached to the front of the organizer.jewelry hanger (16) jewelry hanger (17)This was really difficult as leg has less layers of wood and there was not much material to get screed on but I have managed 🙂jewelry hanger (18)I have to correct painting here and there as it got scratched in few places from the hammer. Then I could work on those hangers. So easy to put it on with two-sided tape but there was so many of them and had to make them straight in the rows and columns.jewelry hanger (19) jewelry hanger (20)Now I just need to organize my jewellery. It is important to separate gold with silver and metal as those materials affect each other and small elements will transfer between them affecting quality.jewelry hanger (26) jewelry hanger (24) jewelry hanger (23)Oh yes, I had to add small bows on left and right to keep the leg flat. It will probably settle after a while but for now I need something to keep it closed.jewelry hanger (29)This is how it looks standing. Exactly how I planned it.jewelry hanger (22)How neat is that? Now I can go back to jewellery making and add more items on this awesome jewellery organizer. I just hope I will not have to make another one soon 🙂 It wasn’t so difficult! Now you know how to organize jewellery with little money and little efforts.