 A few weeks ago my daughter signed up for language course and she asked me to sew some nice fabric tote for her books and notes. I didn’t think much on designing it. It did some up quite nice, so I have decided to make this fabric tote tutorial to show how easy is to sew it.
Start from preparing two strips of fabric measuring 11 cm by 60 cm and one large strip 38 cm by 96 cm.
I have used tapestry which is much stronger and resistant to wear and tear and tapestry threat.
 You can start with either bag or ears of it. We will use French stitch to cover fabric edge and prevent from pilling. First we sew on the left side leaving opening on the end in order to turn it on the right side. I have used this pretty flower mark to show where my opening is.
 Once you turn it then you sew it all around again and opening should be folded inside in order to close in the same way like all around.
  Now you can’t really see where my opening was in the first place.
Now we need to sew main part of tote. This time we will start on the right side of fabric. Cut off a bit of fabric in the corners, so it can fold nicer when we turn it on the left side. Then we need to turn it on the left side and sew it again on left and right. Make sure to keep distance from the edge so all extra fabric will hide inside of covering.
 Can you see how nice and straight it is?
Now we need to sew through the corners. it will create some volume at the bottom and fabric will not be under a lot of stress when you load some wide and heavy items like 2l bottle of water.
I have decided to make about 6.5 – 7 cm wide corners. To make sure both corners are aligned perfectly you can try to create a square and measure each side if they are identical, and then mark and sew through.
 Once this is done you can turn your main part of tote on the right side and see effect of it. Some sewies are cutting off remaining part of those two corners and then sewing with zig-zag to hem it but I prefer to leave it as it is. I feel base is stronger this way.
Next step is to fold top opening of tote. I have asked you to cut quite long piece at the beginning just because I think this top fold should be quite wide to create space for ears. Mine is 5 cm wide. Now we can add ears. You could do it on the inside or on the outside of your tote.
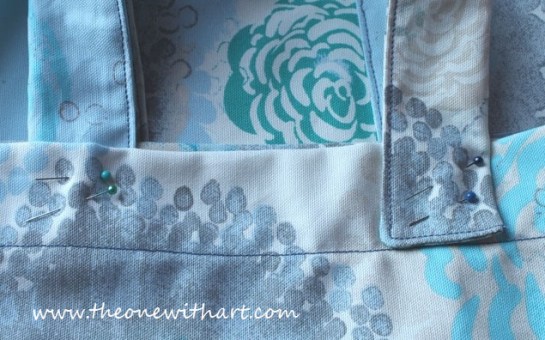 I feel that on the inside makes more proportional impression and finish is neater.
I stitched it all around and across, to create nice square, and it will make sure strong attachment, and I do hope tote can carry at least 6 kg without any damage.  I wouldn’t be myself if I have left off with my tutorial right here. I always love to add something special which makes item more unique. This time I have added handmade jewelry.
 Simply collect different types of beads which you think will match (or contrast) your tote. Then compose them in to an interesting elements which complete each other in the desired shape (I simply mean that when you put it together each side of decoration will have similar amount of beads attached to it).
Then I made one more fabric tote with different set of colours and while I was working on it I have realized that some fabrics have pattern going in the same direction, and you will have to cut main part of fabric in half and turn one of the pieces 180 degrees around so for example, flowers, will not be showing upside down. Now you can create any favorite color combination with beautiful key chain attached to it.
 What is your dream color? If you are looking for more inspiration please e-mail me, and I can add more customaries items just for you.